Wednesday 23 October 2013

Copenhagen Cuisine

A couple of weeks ago i went to Copenhagen for the weekend. Denmark is now world renowned for its food and fine dining, it also famous for being very expensive.

We had a fantastic weekend with lots of delicious food, mainly thanks to our hosts James and Tali. Their local knowledge and home cooking meant we ate very well but didn't spend a fortune.

Here are some of the foodie highlights!

First stop when i arrived in Copenhagen was the organic hot dog stand next to the Rundetarn. Delicious with lots of sauce, mustard, gherkins and 2 types of onion.


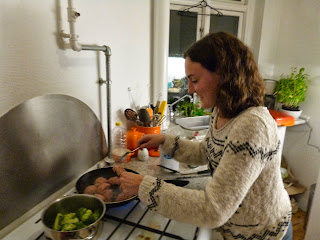
On our first evening in Copenhagen Tali cooked Danish meatballs (frikadeller), we had them with veg and pickled red cabbage.


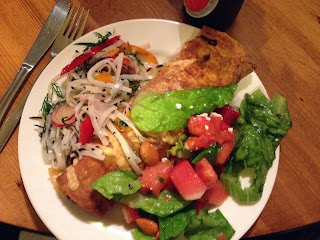
 In Copenhagen there is an area called Christiania, it was set up in the 1970s when a military barracks was taken over and became a commune. It is governed by its own laws. We sat by the lake and had a couple of beers and then headed to the vegetarian restaurant. The menu is small but the food is great. I had a cheesy, beany bake thing with a noodle salad and watermelon salad.

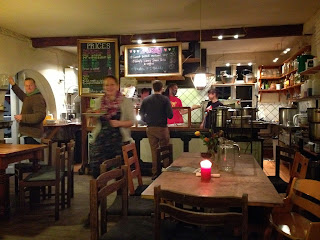
This is as close as we got to a table at Noma, one of the best restaurants in the world.

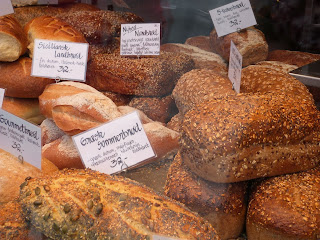
The bakery in Valby near where we were staying had an amazing selection of bread, the Danish really know how to make rye breads and loaves packed with seeds.

 For our last meal before saying goodbye, Clare and Tali opted for the famous Danish open sandwich - Smorrebrod with traditional toppings of prawn, herring and roast beef.

Thanks Tali and James for welcoming us to Copenhagen.

Rachael x


Saturday 19 October 2013

Donatina's Supper Club

Having dabbled with our own supper clubs, cooking for strangers, friends and acquaintances in our own home, you may have assumed that we had been to pop up restaurants ourselves. However until very recently that was not the case.
I finally took the opportunity, a couple of weeks ago, to sit on the other side of the table.
Donatina's kitchen were holding their first supper club in a venue in Maida Vale. Along with my friends Lucinda and James and a couple of bottles of red wine I headed to West London.
We had not seen the menu in advance but with Ana's grandmothers recipes and Jen's creative flare for presentation i was confident we were in for a treat.

I was one of the first people to arrive at the venue, it was surprisingly modern and brightly lit, i think i had imagined somewhere with a more homely, rustic, feel.
The other guests soon started arriving and welcome cocktails of limocello and prosecco were passed around.
The dinner began with bowls of Taralli, little ring shaped bread sticks which were delicious with a rich olive oil taste, not dry and disappointing as they can sometimes be if bought in a packet.
I had to restrain myself from eating too many as i could see from the very detailed menu that there was plenty more to come.
Next up was a trio of Mortadella ham, artichokes and sweet roasted peppers, simple but effective elements that would have been prepared well in advance. I thought throughout the meal that they used wonderful ingredients and can't have scrimped on cost at all.
We were then brought dishes of melanzane parmigiana - layers of aubergine, tomato sauce and cheese. This is something that i have made several times myself, but this was a truly excellent version, tastier than when I've made it, and i finished the huge portion i helped myself to!


The tables of guests were packed in and with the wine flowing it made for a cosy atmosphere.
Packs of cards were brought round and instructions of how to play the game Scopa. Initially it was pretty confusing but after a couple of games we got our heads round it, and it provided a welcome break in the dinner. It had just dawned on me that the parmigiana was not the main course and so it was good to have a pause before embarking on the next dish.
After we had (sort of) mastered Scopa i took the pack over to the next table and did my best to explain the rules to them, i am not sure how successful this was but it was nice to speak to some of the other guests, it is interesting to find out peoples reasons for coming along, something you would never do in a restaurant.


The next course involved ascuitta (a tomato based sauce with chunks of pork and sausage in), broccoli with garlic and chilli and a large slab of pizza chi cicole (homemade bread with layers of pork fat and meat inside). The bread was really good and definitely lived up to the hype.
Finally dessert was a simple dish of baked fruit and ice cream. Figs are one of my favourite things to eat but I was so full by this point i couldn't finish my bowl.
Before departing we were all given a welcome effervescent digestif.

I am confident that they will have had a lot of very satisfied customers at the end of the evening. I would definitely be keen to go to another of their events or a different supper club. Unlike going to a restaurant, you don't have a choice as to what is going to be presented to you, but that somehow just means you know the person producing the food is only going to be giving you dishes that they love and are passionate about.
I have a lot of admiration for Ana and Jen, cooking for 47 people for your first event is a big undertaking and although hiring a venue (rather than doing it in your own home) means you have all the equipment needed and don't have to go scrounging round neighbours for extra chairs - cooking in an unfamiliar kitchen brings it own set of challenges i am sure.

Lucinda, James and I really enjoyed the dinner. Personally i would have preferred plated dishes, but that is mainly because left to my own devices i ran our of space when it came to the later courses.
My favourite thing about the evening was the little additional touches, from the card game and Italian films that were projected on the wall to prosecco prize draw and the basket of rosemary sprigs as you left.
I am sure they've learned a lot from their first endeavour. Not daunted by new challenges their next outing is a bit different and is taking place at a distillery! I think these ladies could go far.

Rachael x


Sunday 22 September 2013

The Three Tier Challenge

My first three tier wedding cake

Just like the three peak challenge, the three tier challenge is pretty daunting. It goes something like this - almost a year ago my cousin tells me that he is engaged and an excitable evening of drinks and wedding chat occurs. During this evening I offer to make the wedding cake - as the words roll off my tongue I'm thinking Jules and Rach are the bakers, not me. I don't even like cake that much, in fact when I was a child I had pavlova every birthday because I decided that I categorically hated all cake. So, a few drinks in - I thought how hard can it be?!

Fruit cake was always my least favourite of the hated cake category. Conjuring up images of dry, crumbly Christmas cake that you have to try because your gran has made it. Marzipan was always abhorred as was dried fruit and candied peel - a repulsive ingredient that tormented me as a child.

So, imagine my joy to discover that in the Caribbean they go for moist cakes filled with brandy AND rum and they blend up all the nasty fruit so that it is a boozy gooey delight! They use vanilla, almond and lemon extract and lots of dark brown sugar - the result is a delicious black cake - Trinidadian in this instance.

Not wanting to limit my cake practising skills we went for three different cakes and although I got the fruit cake out of the way early on, as the wedding day approached lemon polenta cakes and chocolate cakes were flying out of the oven left, right and centre.

In the end I settled on the River Cafe lemon polenta cake, as recommended my my favourite chef at Spuntino. It is a fool proof recipe - moist and delicious and it stays this way for several days. I now bake this cake regularly.

For the middle 9 incher we had decided on chocolate. Having tested three different recipes and not quite been satisfied I decided to head for Delia and she delivered as always. I was caked out by that point and feeling fairly confident that I did not need to practice another one - I probably would not recommend wedding cake baking without practising, but it worked! The recipe is actually an Anna Del Conte Italian chocolate nut Christmas cake - a beautiful sturdy cake that is flourless (as is the lemon cake) so you have your gluten free fan base covered. Having spent £10 on hazelnuts alone it is not the cheapest of cakes but again it is moist and lasts for several days, which is important if you are trying to minimise your stress levels.

Having done a cake decorating class with Victoria Glass earlier in the year I spent a day marzipanning, stacking, icing and decorating the cake which was actually quite therapeutic! Trauma came when we drove 4.5 hours from London to Devon and I held the cake on my lap - the cake was a weighty boy when all stacked and wrapped in icing. Amazingly (or rather because I could not reach) I avoided punching the taxi driver as we drove across London to hire a car when he slammed on the brakes and the cake slammed itself into the seat in front. All was rescued in Devon and the cake was a hit.

Success all round.

Next step - wedding cake number two and the three peak challenge.

Sunday 8 September 2013

Nunhead Blackberry Jam


Last summer I made my first attempt at jam making. I was at home in Gloucestershire during strawberry season so headed to Over Farm Market and picked a mountain of delicious juicy strawberries. The jam was a big hit and the jars i handed out to my friends and family did not last long, which was a good thing because the couple of jars I left in the cupboard got mouldy after a few weeks. The jam was also runnier than i would have liked.

This year I spent most of the summer in London, I was keen to try my hand at another batch of jam but didn't want to spend a fortune on punnets of fruit from supermarkets.
The one berry i knew i could find in abundance, and for free, a few minutes walk from my house, were blackberries.
On the other side of Peckham Rye there is a huge over grown cemetery in Nunhead. In amongst the neglected graves and shady trees, at this time of year, there are mountains of ripe blackberries.

I headed to the cemetery armed with a big 4L tupperware and a couple of hours later returned home with well over a kilo of fruit and a few stings and scratches to show for my afternoons foraging.

I reserved some of the riper berries for eating and pie making and used most of them for the jam.
Below is a rough guide to how a i went about making the jam. I looked at a few recipes online and found some useful tips in the Preserves River Cottage Handbook. 

If i was to make the jam again i think i would use a bit less sugar and perhaps a mix of normal sugar and jam sugar. I don't think i needed quite the amount of pectin that i added (by using all jam sugar which comes with pectin in it).

The quantities below filled about 5 standard size (400g) jam jars

Ingredients:
1kg blackberries (not too squishy and ripe)
1.25 kg jam sugar
100ml lemon juice (3 small lemons)

Method:
Before setting out fruit picking I dug out some empty jam jars and soaked them in a sink of hot soapy water until the labels came off.
I rinsed and drained them and on my return put them in the oven (along with the lids) at 100C while I made the jam.

I gently washed the blackberries removing any twigs and spiders and then dried them by tipping them out onto kitchen towel.

Before starting to make the jam I put a few saucers in the freezer to get cold as them come in handy when checking that the jam is ready, very useful if you don't have a jam thermometer.

I got out Ceri's huge chutney making pan (make sure you have plenty of room as the jam will bubble up) and chucked in 200-300g of the blackberries with the same amount of sugar. I then crushed the berries with a potato masher.
The pan was then heated gently and once the mixture was warm I added the rest of the berries and brought the jam up to simmering point, stirring with a wooden spoon to stop the fruit sticking to the bottom of the pan. After 5 minutes of simmering I added the remaining jam sugar.

You then need to stir the jam until the sugar has dissolved, this took longer than i expected, about 10 minutes of heating and stirring, checking the back of the spoon for sugar granules.
Once the sugar had dissolved i added the lemon juice and increased the heat until the mixture boiled.

The jam bubbled up the sides of the pan, i let it boil for about 10 minutes without stirring.
I then tested the setting point by dripping a little of the jam onto one of the cold saucers which i had put in the freezer. If you poke the blob of jam on the saucer with you fingertip, if it has set the surface will wrinkle, you can then be confident your jam is ready.

I removed the jam from the heat, gave it a quick stir and took the sterilized jam jars out of the oven.
I then decanted the jam into the jars while it was still hot. I placed a circle of grease proof paper on the top of each full jar before screwing on the lids.

Once the jars had cooled i made sure the lids were tight and then they were ready for labeling and storing in the cupboard ready to be eaten.
Given the amount of sugar i added i am confident my blackberry jam will last a lot longer than last years effort!

Rachaelx


Tuesday 27 August 2013

The Salad of the Summer...

Goes to - Panzanella!

 Tomatoes from Cossano Belbo in Piedmont
Over the last couple of months I have been making panzanella at every given opportunity. This summer salad originates from Tuscany and combines stale bread (a perfect way to use it up) with the tastiest tomatoes, basil and cucumber in an olive oil and wine vinegar dressing. As with many recipes there are lots of variations so this recipe is a mere starting point for salad explorations.

If you are in London and want to try one of the best panzanella salads around then to head to Spuntino quickly, while they still have heritage tomatoes that will change your life or at least bring a smile to your face.

This serves roughly 4 people.

ingredients-
1 garlic clove, sliced in half
left over bread, country style such as ciabatta, torn into bite size pieces
6-8 ripe heritage tomatoes, chopped into pieces
1/2 cucumber, peeled and chopped into pieces
2 tbsp basil leaves, chopped
80ml olive oil
2-3 tbsp wine vinegar
salt & pepper

I like to toast the torn up bread under the grill for several minutes. Some recipes tell you to moisten the bread with water which is another option before adding the bread to the salad.

Rub the garlic around your serving bowl and add the tomato pieces and cucumber. Add the basil to the bowl along with the bread.

Make the dressing and add to the salad, leaving it to flavour the ingredients for 15-20 minutes before serving. Add salt, pepper and additional vinegar if you wish.

Close your eyes and pretend you're on the Ponte Vecchio in Florence.


Tuesday 20 August 2013

A Taste of Tahiti


Poisson cru au lait de coco
My first taste of poisson cru on the island of Moorea. Rum Punch in the foreground.

 As if my holiday on an island in the Pacific wasn't paradisiacal enough, my host approached me with concern to inquire whether I minded eating a lot of fish.   Fresh and delicious, fished straight from the ocean and cooked on an open fire.  Or alternatively not cooked at all; the Tahitian national dish, Poisson Cru, is a ceviche-like dish made from raw fish, preferably tuna.

UM hello did I mind??  I nearly fell of my deckchair in delight.

I feel it necessary to share the joy of this simple dish.  Unlike ceviche it does not cook in the marinade - the aim is to serve is raw.  So you need a really fresh, good quality catch, sustainably sourced of course.  It melts in the mouth and is good for the body and soul.  Take a taste and be transported to the paradise islands of French Polynesia.

Best served on a private island in the Pacific, with fish freshly caught by beautiful Tahitian men, with coconut milk freshly pressed from the laden palm trees, sitting on a beach overlooking a blue lagoon, at sunset.  Failing that, a dose of imagination is required.

Mass coconut shredding in preparation for Flo's wedding feast
Beautiful men fishing off the reef (le récif) into the Pacific
Poisson cru au lait de coco
(Raw fish in coconut milk)

With many thanks to Flo's Aunty for sharing her recipe.  (NB given age-old recipe and lack of scales on deserted island, this recipe is less exact than usual and quantities are approx - don't feel constrained by them)

Ingredients:
Serves 6
500g fresh, sustainably-sourced tuna
3 tomatoes
1 cucumber
1 clove garlic
1/2 onion
coconut milk (2 tins but may not need all)
To season: lemon or lime (1 or 2 small ones), salt, pepper

Method:

1. Cut the tuna into cubes and rinse in salted water (pref. the sea!)

2. Dice the tomatoes and cucumber. Finely slice the onion and crush the garlic.

3. Season the coconut milk with salt, pepper and lemon/lime juice. (So if you don't have a bowl of fresh milk pressed straight from the day's windfall, I'd advise putting 1 1/2 tins in a bowl and seasoning.  You can add the rest later if you think it needs it).

4. Add all the veg and finally the fish to the coconut milk and serve immediately (you don't want to allow the fish to 'cook' at all in the lemon/lime juice).

Ma'a (aka food): Délicieux

by Jules 


Thursday 8 August 2013

Pork Pies - Dan Lepard


I have always wanted to try my hand at making pork pies from scratch.
Being my first attempt i did not want to make a huge cake sized pie so i opted to follow a recipe from one of my favourite cook books - Short and Sweet by Dan Lepard.
Another plus to this recipe is that it uses a stock cube and gelatine sheets to make the jelly so you don't have to make it your self from pork bones and worry about it setting - maybe i'll try that next time!

The recipe details as well as in the cook book are available on the Guardian website here 

They take quite a while to make, you really need to get the ingredients ready 3 days before you actually want to eat the pie but the processes involved are very simple and even achievable on a hung over Sunday afternoon.

I chopped the meat ingredients up and mixed them with the spice on Saturday.

On Sunday afternoon i made the pastry, because this type of pastry is made with hot water you need to allow an hour or so for it to cool down before you can actually use it. Don't put it in the fridge though as it would get too cold and become difficult to work.
I found shaping the pastry round the jar the most fiddly stage of the process, it took a while to get used to how much you can mess around with the fatty dough, i am used to shortcrust pastry which you handle as little as possible. Once I had squashed all the folds that formed, from draping it over the jar the pastry looked like it was going to be quite tall but i found the pie shells relaxed a lot once i removed them from the jar and made a wider shallower pie.

Once filled and the lids added the pies need to chill for a while in the fridge before they are baked in the oven.
While the pies bake the meat shrinks in size leaving a gap between the filling and pastry, this is where the jelly comes in.
After cooling for half an hour the hot jelly mixture is poured into the pies through a hole in the top, the pies then need to be returned to the fridge and so won't be ready for sampling until the following day.

This recipe makes 2 generous sized pies which will take you a while to get through, they last up to 2 weeks in the fridge though.


Best enjoyed with a picnic on Primrose Hill after playing rounders!

Rachael x